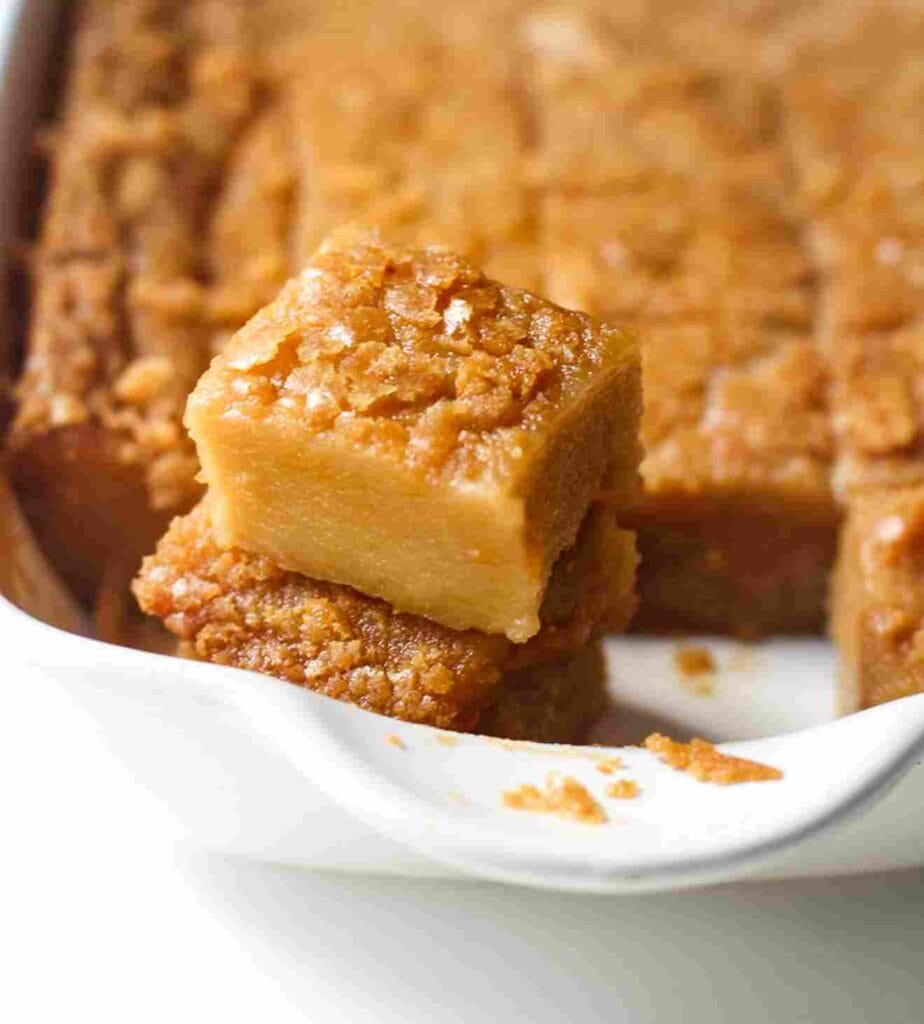
Butter mochi: this rich, buttery delight with a tropical twist has captured the hearts (and taste buds) of dessert lovers everywhere. As a passionate cook with a penchant for exploring unique flavors, I’ve spent countless hours perfecting what I consider the ultimate this recipe. This dessert isn’t just a treat; it’s an experience, an ode to the creamy, slightly chewy texture that makes mochi so irresistible. Today, I’m thrilled to share with you every step, tip, and secret to making the best butter mochi you’ve ever tasted.

Recipe Overview
- Course: Dessert
- Cuisine: Hawaiian-Japanese
- Total Servings: 12
- Prep Time: 15 minutes
- Cook Time: 60 minutes
- Total Time: 1 hour 15 minutes
Kitchen Equipment Needed
Before you dive into the making of butter mochi, ensure you have the right tools to make your cooking process as smooth as the texture of this dessert. You’ll need:
- A large mixing bowl
- Measuring cups and spoons
- A whisk or electric mixer
- A 13×9 inch baking pan
- A rubber spatula
Ingredients
| Ingredient | Quantity |
|---|---|
| Sweet rice flour (mochiko) | 2 cups |
| Sugar | 1 1/2 cups |
| Baking powder | 2 teaspoons |
| Salt | 1/4 teaspoon |
| Butter, melted | 1/2 cup |
| Coconut milk | 1 can (14 oz) |
| Whole milk | 1 cup |
| Eggs | 3 large |
| Vanilla extract | 1 teaspoon |
| Shredded coconut | 1/2 cup (optional) |
Fun Fact: Did you know that mochi was originally a food eaten by the gods during the Japanese Heian period? It became a celebration food among common folks much later.
Step-by-Step Instructions
Step 1 – Prepare the Oven and Pan
- Preheat your oven to 350°F (175°C).
- Generously grease your baking pan with butter or a non-stick spray to prevent sticking.
Ensure every corner of the pan is well-greased for a perfect butter mochi release.
Step 2 – Mix Dry Ingredients
- In your large mixing bowl, sift together the sweet rice flour, sugar, baking powder, and salt.
- Stir these ingredients until they are well combined, ensuring there are no lumps.
Step 3 – Combine Wet Ingredients
- In a separate bowl, whisk together the melted butter, coconut milk, whole milk, eggs, and vanilla extract.
- Ensure that the mixture is smooth and the eggs are completely incorporated.
Step 4 – Combine Wet and Dry Ingredients
- Gradually add the wet ingredients to the dry ingredients while stirring with a whisk or on a low setting with your electric mixer.
- Continue mixing until the batter is smooth and free of lumps.
A smooth batter leads to the silky texture butter mochi is known for.
Step 5 – Pour and Sprinkle
- Pour the batter into the prepared baking pan.
- If using, sprinkle the top evenly with shredded coconut.
Step 6 – Bake
- Bake in the preheated oven for 1 hour or until the top is golden brown and a toothpick inserted into the center comes out clean.
The golden brown color is your cue to a perfectly cooked butter mochi.
Step 7 – Cool and Cut
- Allow the mochi to cool in the pan for at least 30 minutes.
- Cut into pieces using a plastic knife to avoid sticking.
Additional Tips
- Texture Tip: For a chewier texture, increase the amount of coconut milk slightly.
- Flavor Twist: Experiment with adding different extracts like coconut or almond for a new flavor dimension.
Pairing Suggestions
Butter mochi is versatile and pairs wonderfully with a variety of beverages and settings. Whether it’s a casual get-together or a more formal event, here are some pairing ideas:
- A cup of hot green tea
- A cold glass of iced coffee
- Fresh tropical fruits like pineapple or mango
Nutritional Information
| Nutrient | Amount per serving |
|---|---|
| Calories | 273 kcal |
| Carbohydrates | 39 g |
| Protein | 3 g |
| Fat | 12 g |
| Cholesterol | 55 mg |
| Sodium | 112 mg |
This information is approximate; your results may vary depending on ingredient choices and serving sizes.
Dietary Information
This butter mochi recipe is naturally gluten-free thanks to the sweet rice flour. If you’re looking to adapt it to a vegan diet, swap out the dairy milk and butter for plant-based alternatives and use egg substitutes.
FAQs about Butter Mochi
What is butter mochi?
Butter mochi is a Hawaiian dessert made from sweet rice flour, resulting in a chewy texture with a buttery, coconut flavor.
Can I make butter mochi without coconut?
Yes, you can substitute the coconut milk with more dairy milk or a non-dairy milk of your choice, though it will alter the flavor slightly.
How do I store butter mochi?
Store butter mochi in an airtight container at room temperature for up to three days, or refrigerate it for a week.
Why is my butter mochi rubbery?
Rubbery texture can result from overmixing the batter or overbaking. Mix just until combined and keep an eye on the baking time.
Can I freeze butter mochi?
Yes, butter mochi freezes well. Wrap it tightly in plastic wrap and it will keep for up to a month.
How do I prevent butter mochi from sticking to the knife when cutting?
Use a plastic knife or lightly grease a metal knife to make clean cuts without sticking.
Can I add other flavors to butter mochi?
Absolutely! Feel free to add other extracts, zests, or mix-ins like nuts or chocolate chips to customize your butter mochi.
Conclusion
There you have it—the perfect butter mochi recipe to delight your senses and bring a taste of the islands into your home. It’s easy, delicious, and absolutely satisfying. Give it a try, and I guarantee it’ll become a favorite.
I’d love to hear your thoughts and any modifications you tried. Feel free to leave comments, questions, or feedback on the recipe. Happy baking!
Check out some more delicious dessert recipes:
- Protein Brownies Recipe
- Strawberry Crunch Cake Recipe
- Chocolate Coffee Cake Recipe
- Hazelnut Tartufo Recipe
- Bourbon Creme Brulee Recipe
- Pie Charlotte Recipe: The Ultimate Classic Dessert

Butter Mochi Recipe
Equipment
- A large mixing bowl
- Measuring cups and spoons
- A whisk or electric mixer
- A 13×9 inch baking pan
- A rubber spatula
Ingredients
- 2 cups Sweet rice flour mochiko
- 1 1/2 cups Sugar
- 2 teaspoons Baking powder
- 1/4 teaspoon Salt
- 1/2 cup Butter melted
- 1 can 14 oz Coconut milk
- 1 cup Whole milk
- 3 large Eggs
- 1 teaspoon Vanilla extract
- 1/2 cup Shredded coconut optional
Instructions
Step 1 – Prepare the Oven and Pan
- Preheat your oven to 350°F (175°C).
- Generously grease your baking pan with butter or a non-stick spray to prevent sticking.
- Ensure every corner of the pan is well-greased for a perfect butter mochi release.
Step 2 – Mix Dry Ingredients
- In your large mixing bowl, sift together the sweet rice flour, sugar, baking powder, and salt.
- Stir these ingredients until they are well combined, ensuring there are no lumps.
- See also San Giorgio Mac and Cheese Recipe
Step 3 – Combine Wet Ingredients
- In a separate bowl, whisk together the melted butter, coconut milk, whole milk, eggs, and vanilla extract.
- Ensure that the mixture is smooth and the eggs are completely incorporated.
Step 4 – Combine Wet and Dry Ingredients
- Gradually add the wet ingredients to the dry ingredients while stirring with a whisk or on a low setting with your electric mixer.
- Continue mixing until the batter is smooth and free of lumps.
- A smooth batter leads to the silky texture butter mochi is known for.
Step 5 – Pour and Sprinkle
- Pour the batter into the prepared baking pan.
- If using, sprinkle the top evenly with shredded coconut.
Step 6 – Bake
- Bake in the preheated oven for 1 hour or until the top is golden brown and a toothpick inserted into the center comes out clean.
- The golden brown color is your cue to a perfectly cooked butter mochi.
Step 7 – Cool and Cut
- Allow the mochi to cool in the pan for at least 30 minutes.
- Cut into pieces using a plastic knife to avoid sticking.
Notes
- Texture Tip: For a chewier texture, increase the amount of coconut milk slightly.
- Flavor Twist: Experiment with adding different extracts like coconut or almond for a new flavor dimension.


Leave a Reply