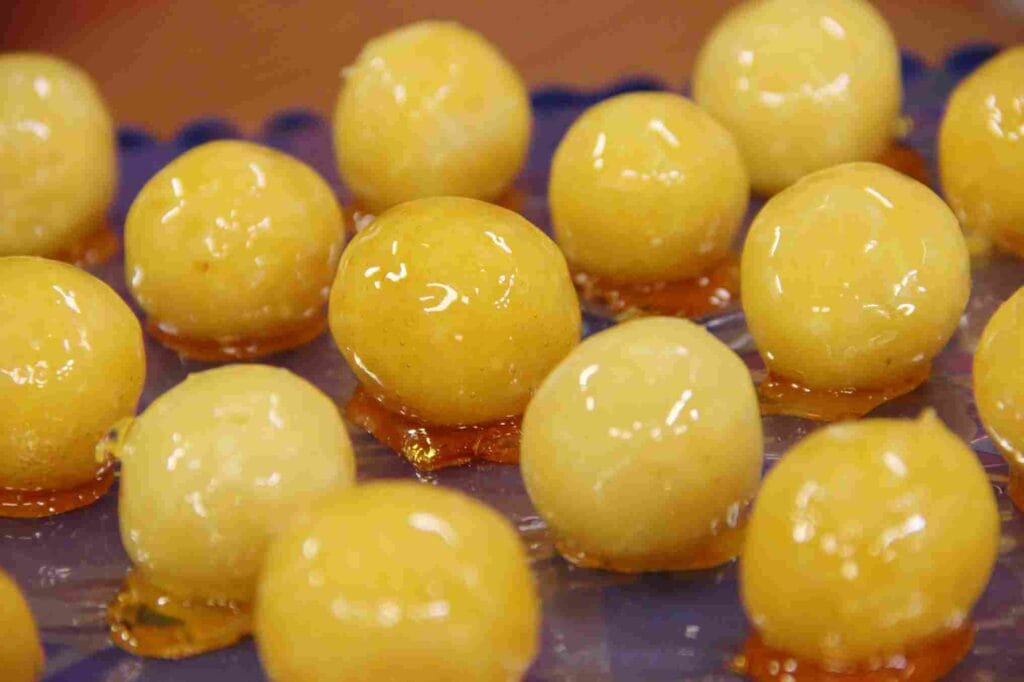
Have you ever craved something utterly unique from the heart of Brazil, right in your kitchen? Today, I’m thrilled to walk you through the iconic Bala Baiana recipe, a traditional Brazilian delight that’s as intriguing as it is delicious. My love affair with this dish began on a sunny afternoon in Salvador, where the blend of flavors first danced on my palate. Let’s dive into making this treat that’s sure to enchant your taste buds.
Recipe Overview
- Course: Dessert
- Cuisine: Brazilian
- Total Servings: 12
- Prep Time: 15 minutes
- Cook Time: 30 minutes
- Total Time: 45 minutes
Kitchen Equipment Needed
Before you start, make sure you’ve got the right tools for the job. Preparing Bala Baiana is a delight, and with these tools, it becomes a breeze:
- Medium saucepan
- Wooden spoon
- Measuring cups and spoons
- Baking sheet
- Parchment paper
Ingredients
| Ingredients | Quantity |
|---|---|
| Coconut milk | 1 cup |
| Sweetened condensed milk | 1 can |
| Sugar | 2 cups |
| Cocoa powder | 3 tablespoons |
| Butter | 1 tablespoon |
| Cloves | 5 whole cloves |
Fact: Did you know Bala Baiana translates to “Baiana candy” and is a beloved treat across Brazil, often enjoyed during festive seasons?
Step by Step Instructions
Step 1 – Prepare the Mixture
- In your saucepan, combine coconut milk, sweetened condensed milk, sugar, cocoa powder, and butter.
- Stir over medium heat until the sugar dissolves completely.
- Add the whole cloves; these will infuse the mixture with a subtle spice.
Note: Keep the heat moderate to avoid burning the sugar.
Step 2 – Let it Simmer
- Continue cooking the mixture until it thickens and starts to pull away from the sides of the pan.
- This will take about 15-20 minutes. The key here is patience; let the flavors meld together.
Warning: Stir continuously to prevent the mixture from sticking and burning.
Step 3 – Cooling Down
- Once the mixture is thick and shiny, remove from heat.
- Discard the cloves and pour the mixture onto a greased baking sheet lined with parchment paper.
- Allow it to cool until it’s just warm to the touch.
Fact: The cooling step is crucial for achieving the perfect texture for your candies.
Step 4 – Shape Your Candies
- Grease your hands with a bit of butter and start shaping the mixture into small balls.
- Place them on a parchment-lined tray to set, about 1 hour in a cool place.
Note: If the mixture sticks to your hands, butter them slightly more.
Additional Tips
- If you find the mixture too thick, add a tablespoon of milk to loosen it up.
- For a nut-free version, ensure all your ingredients are free of cross-contaminants.
Pairing Suggestions
Pair these delightful treats with a cup of strong Brazilian coffee or a glass of chilled dessert wine. Ideal for:
- After-dinner treats
- Festive gatherings
Nutritional Information
| Nutrient | Amount per serving |
|---|---|
| Calories | 150 kcal |
| Carbohydrates | 20 g |
| Protein | 2 g |
| Fat | 7 g |
Approximation Note: These values are approximate and can vary based on ingredient substitutions and portion sizes.
Dietary Information
This Bala Baiana recipe is vegetarian-friendly and can be adapted for vegan diets by substituting coconut oil for butter and using vegan condensed milk.
FAQs about Bala Baiana Recipe
What makes Bala Baiana unique?
The unique blend of coconut, cocoa, and cloves offers a taste that’s distinctly Brazilian, rich and festive.
How can I store Bala Baiana candies?
Store them in an airtight container at room temperature for up to a week or refrigerate for longer shelf life.
Are there any key allergens in Bala Baiana?
This recipe contains dairy and traces of gluten, so it’s not suitable for those with allergies to these items.
Can I make Bala Baiana without sugar?
Yes, you can use alternatives like coconut sugar or agave syrup, but the texture and taste will differ.
What’s the best way to serve Bala Baiana?
Serve them at room temperature to best enjoy their texture and flavors.
Can Bala Baiana be frozen?
Yes, you can freeze the candies for up to 3 months, wrapped individually in wax paper.
How can I ensure my Bala Baiana candies are perfect?
Follow the mixture cooking times closely and allow proper cooling before shaping the candies.
Conclusion
There you have it, a delicious Bala Baiana recipe that’s as enjoyable to make as it is to eat. It’s a simple yet delightful treat that brings a piece of Brazil into your home. Experiment with it, and maybe you’ll find your own twist to this classic recipe.
Feel free to leave comments, questions, or feedback on the recipe. Let’s share our experiences and keep the culinary conversation going!
Check out some more delicious dessert recipes:
- Guyanese Pine Tart Recipe
- Patti LaBelle Banana Pudding Recipe
- Costco Fruitcake Recipe
- Cici’s Cinnamon Rolls Recipe
- Maggiano’s Gigi Butter Cake Recipe: A Sinful Delight from Scratch
- Fricassee Cake Recipe: A Delightful Dessert for Any Occasion
Bala Baiana Recipe
Equipment
- Medium saucepan
- Wooden spoon
- Measuring cups and spoons
- Baking sheet
- Parchment paper
Ingredients
- 1 cup Coconut milk
- 1 can Sweetened condensed milk
- 2 cups Sugar
- 3 tablespoons Cocoa powder
- 1 tablespoon Butter
- 5 whole Cloves
Instructions
Step 1 – Prepare the Mixture
- In your saucepan, combine coconut milk, sweetened condensed milk, sugar, cocoa powder, and butter.
- Stir over medium heat until the sugar dissolves completely.
- Add the whole cloves; these will infuse the mixture with a subtle spice.
- Note: Keep the heat moderate to avoid burning the sugar.
Step 2 – Let it Simmer
- Continue cooking the mixture until it thickens and starts to pull away from the sides of the pan.
- This will take about 15-20 minutes. The key here is patience; let the flavors meld together.
- Warning: Stir continuously to prevent the mixture from sticking and burning.
Step 3 – Cooling Down
- Once the mixture is thick and shiny, remove from heat.
- Discard the cloves and pour the mixture onto a greased baking sheet lined with parchment paper.
- Allow it to cool until it’s just warm to the touch.
- Fact: The cooling step is crucial for achieving the perfect texture for your candies.
Step 4 – Shape Your Candies
- Grease your hands with a bit of butter and start shaping the mixture into small balls.
- Place them on a parchment-lined tray to set, about 1 hour in a cool place.
- Note: If the mixture sticks to your hands, butter them slightly more.
Notes
- If you find the mixture too thick, add a tablespoon of milk to loosen it up.
- For a nut-free version, ensure all your ingredients are free of cross-contaminants.


Leave a Reply